I discovered Kumihimo a few months ago....so I am still a beginner, but I will try to show you some of my basic knowledge.
Kumihimo started as a finger-loop braiding and the tools, the marudai and takadai, were used to make the weaving easier. The modern and cheaper version of these tools is a disk made of flexible foam or plastic with small cuts on the periphery to insert the threads. The disk has 32 notches as the one you see in the picture bellow.
Kumihimo started as a finger-loop braiding and the tools, the marudai and takadai, were used to make the weaving easier. The modern and cheaper version of these tools is a disk made of flexible foam or plastic with small cuts on the periphery to insert the threads. The disk has 32 notches as the one you see in the picture bellow.
You will need a disk and color treads. Different material, number of strands and color will give you different results and patterns. You can use ribbon, yarn, string, silk thread, etc; all depends of your creativity. You can also add beads in the weaving.
First thing you need to do is cut the threads. Determine the final length you want and then multiply the length by three. This will give you a good final size.
Then arrange the threads on the disk and begin to weave. You will cross the threads in a different manner to obtain the different patterns. So let's learn the basic procedure and then we can get fancy. Here are a couple of links with very good explanations.
Kumihimo tutorial posted by RubberStampRosie in YouTube
Kumihimo tutorial posted by Artbeads
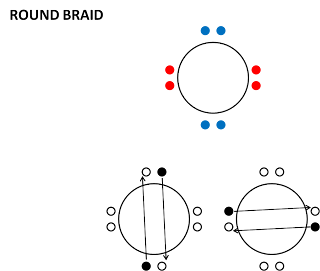
Bellow are the basic patterns for the round and square braid.
Round braid in kumhimo disk:
Square braid in kumihimo disk:
Practice this two types of braids and when you are comfortable move to the more complex ones.
I will post patterns for other types of braids later, and you can also try the Kumihimo plate to create a flat braid.
Also, when you fill comfortable you can check this free software by Rosalie Nelson Braid Runner that will allow you to design your own color patterns.
Enjoy...!!!


No comments:
Post a Comment